> For the complete documentation index, see [llms.txt](https://doc.dastra.eu/llms.txt). Markdown versions of documentation pages are available by appending `.md` to page URLs; this page is available as [Markdown](https://doc.dastra.eu/en/getting-started/setup/workspace.md).

# Create and set up a workspace

Learn how to create your first workspace in Dastra.

This page explains how to create a workspace, invite its first users, declare your first entity and move between your workspaces.

## Sign in to Dastra

Start by signing in at [app.dastra.eu](https://app.dastra.eu). If you don't have an account yet, ask an administrator of your organization to invite you. If your organization does not use Dastra yet, [ask for a demo](https://www.dastra.eu/en/contacts/demo).

## Workspace

A workspace is **an organization that holds one or more records of processing activities**. You can create one workspace per record, per legal entity or per branch, as you choose. For the definitions of the other concepts (organization, organizational unit, entity, department), see [Key concepts](https://doc.dastra.eu/en/getting-started/setup/key-concepts.md).

{% hint style="warning" %}
A workspace is an environment whose **data is fully partitioned**: the records of one workspace (processing activities, assets, requests and so on) are never accessible from the context of another workspace. You can, however, view **consolidated statistics** across all your workspaces from the cross-workspace dashboard (see [Cross-workspace statistics](#cross-workspace-statistics)), and duplicate items (processing activities, assets and so on) from one workspace to another.
{% endhint %}

## Create a workspace

Only organization owners can create a workspace.

1. On the page that lists your workspaces, click **Create Workspace**.
2. Fill in **Choose a label for your workspace**, which is required.
3. Optionally, add the workspace **Logo**: a square image of at least 200 x 200 px, cropped automatically.
4. Choose the language in the **Select the language used to provision the workspace elements** list.
5. Click **Continue**.

<figure><img src="https://2697025545-files.gitbook.io/~/files/v0/b/gitbook-x-prod.appspot.com/o/spaces%2F-LvBxs22wUMicv9uWp6C-1972196547%2Fuploads%2Fgit-blob-908c9dfaeec89f16442bfd2d2b0a3f72f60b02c2%2Fgetting-started-workspace-3.png?alt=media" alt="Workspace creation form"><figcaption><p>The workspace creation form</p></figcaption></figure>

To start from the configuration of an existing workspace, tick **Clone settings from another workspace**, choose the **Source workspace** and, if needed, tick **Include assigned users and teams**. The language choice disappears: the new workspace uses the language of the source workspace.

{% hint style="info" %}
Once the workspace is created, you can set up its organizational units and invite users.
{% endhint %}

### Invite the first users

After the creation, Dastra opens the users page of the new workspace. You can add existing users of the organization or invite new users with **Invite user**.

<figure><img src="https://2697025545-files.gitbook.io/~/files/v0/b/gitbook-x-prod.appspot.com/o/spaces%2F-LvBxs22wUMicv9uWp6C-1972196547%2Fuploads%2Fgit-blob-2f7721b5cf225203ad1dcef5a70e31682b70c819%2Fgetting-started-workspace-4.png?alt=media" alt="Step for inviting the first users of a workspace"><figcaption><p>The user invitation step</p></figcaption></figure>

Assign each user the role of your choice, then click **Next**. For the details of the invitation fields, see [Invite users](https://doc.dastra.eu/en/getting-started/setup/users.md).

### Create the first entity

In Dastra, a workspace is not a legal entity: it can group several, as in a corporate group. Each entity corresponds to a controller, and an entity has only one legal representative.

To create the first entity, fill in its **Entity name** and its **Country**: these are the two required fields. You can also indicate its representatives (the person in charge and the legal representative) and, if one has been appointed, its data protection officer.

<figure><img src="https://2697025545-files.gitbook.io/~/files/v0/b/gitbook-x-prod.appspot.com/o/spaces%2F-LvBxs22wUMicv9uWp6C-1972196547%2Fuploads%2Fgit-blob-65a87cd2ae3f3f778d7222f65460255d5fdf0396%2Fgetting-started-workspace-5.png?alt=media" alt="Form for creating the first entity of the workspace"><figcaption><p>The form for creating the first entity</p></figcaption></figure>

Click **Continue** to enter your workspace. You can also click **Skip this step** and create your entities later.

### Create other entities and departments

Once your workspace is open, fill in the other legal entities and the departments as soon as possible. It simplifies the management of processing activities and the allocation of user rights later.

1. In the left menu, click **Workspace settings**, then **Organizational units**.
2. Click **Create an entity** to add a legal entity, or open the button's menu to choose **Create department**.
3. Repeat until the organization chart of your structure is represented in Dastra.

<figure><img src="https://2697025545-files.gitbook.io/~/files/v0/b/gitbook-x-prod.appspot.com/o/spaces%2F-LvBxs22wUMicv9uWp6C-1972196547%2Fuploads%2Fgit-blob-75d400d04eab7a25c198c08b691467c9599c4ed3%2Fv3-improvements-org-units-3.png?alt=media" alt="Organigram view of the organizational units in Dastra"><figcaption><p>The Organigram view</p></figcaption></figure>

For child departments, child entities, import and deletion, see [Create and set up organizational units](https://doc.dastra.eu/en/getting-started/setup/organizational-units.md).

## Set the default time zone

The default time zone is the reference time zone of the workspace. Dastra uses it for dates that concern the workspace as a whole rather than one person.

1. In the left menu, click **Workspace settings**, then **General**.
2. In **Default timezone**, choose the time zone.
3. Click **Save changes**.

<figure><img src="https://2697025545-files.gitbook.io/~/files/v0/b/gitbook-x-prod.appspot.com/o/spaces%2F-LvBxs22wUMicv9uWp6C-1972196547%2Fuploads%2Fgit-blob-88a9d7c74e862d087e4ca7cadde283d91c22e57b%2Fv3-improvements-workspace-1.png?alt=media" alt="Workspace settings with the Default timezone field"><figcaption><p>The Default timezone field of the workspace settings</p></figcaption></figure>

Only workspace owners can change it. A workspace starts with the time zone of the user who created it.

The default time zone applies to:

* the day on which due-date and expiry reminders are sent (tasks, contracts, processing activities and so on), and the dates written in those emails;
* the dates written in the invitation and reminder emails of compliance audits;
* the calendar day used by the date conditions of workflow rules;
* the dates printed on the export of a processing activity shared by link, where no user is signed in;
* the time zone of the users you invite to the workspace: their profile starts with it, and they can change it afterwards.

Each user keeps their own time zone for what is displayed to them and addressed to them personally.

{% hint style="info" %}
The default time zone does not move the time at which a workflow rule, an AI agent or a scheduled sending runs. These times are chosen in your own time zone, shown in the editor.
{% endhint %}

## Access a workspace

1. Sign in to the application with your user account.
2. Click your workspace tile in the list that appears.

<figure><img src="https://2697025545-files.gitbook.io/~/files/v0/b/gitbook-x-prod.appspot.com/o/spaces%2F-LvBxs22wUMicv9uWp6C-1972196547%2Fuploads%2Fgit-blob-be14fed1b9dae79bc86d39b89be6ca7200eb1a8a%2Fgetting-started-workspace-1.png?alt=media" alt="List of workspaces displayed as tiles"><figcaption><p>The list of workspaces</p></figcaption></figure>

You are now in your workspace. To switch workspace at any time, click the workspace selector at the top of the left sidebar.

<figure><img src="https://2697025545-files.gitbook.io/~/files/v0/b/gitbook-x-prod.appspot.com/o/spaces%2F-LvBxs22wUMicv9uWp6C-1972196547%2Fuploads%2Fgit-blob-1ddd65a793e7cf43848c7764759831b14c5489ff%2Fgetting-started-workspace-2.png?alt=media" alt="Workspace selector open at the top of the left sidebar"><figcaption><p>The workspace selector</p></figcaption></figure>

## Cross-workspace statistics

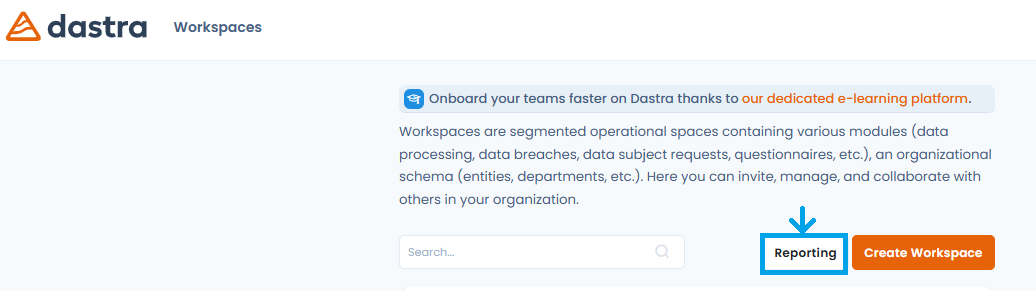
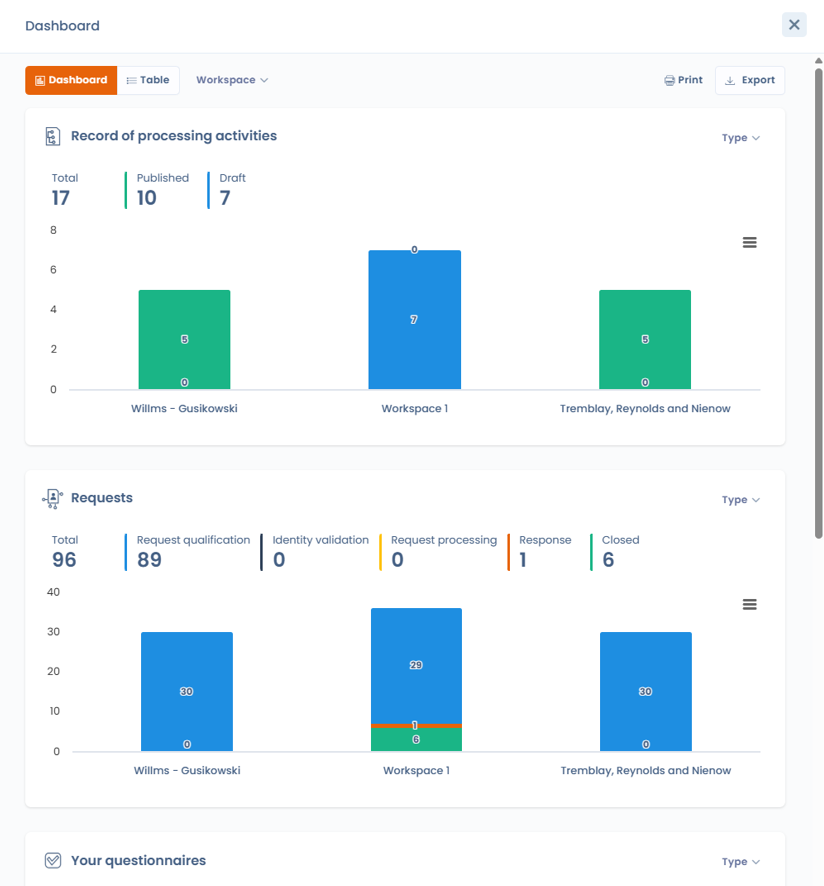
The cross-workspace dashboard brings together the key indicators of all your workspaces in a single view. Owners access it with the **Reporting** button from the list of workspaces.

<figure><img src="https://2697025545-files.gitbook.io/~/files/v0/b/gitbook-x-prod.appspot.com/o/spaces%2F-LvBxs22wUMicv9uWp6C-1972196547%2Fuploads%2Fgit-blob-6b8ca171224211ab79d0a262110e0e9793cd458f%2Fworkspaces-reporting-button.png?alt=media" alt="Reporting button in the workspace list"><figcaption><p>The Reporting button opens the cross-workspace dashboard from the workspace list</p></figcaption></figure>

It consolidates the indicators of the main modules: record of processing activities (ROPA), data subject requests, incidents, questionnaires, AI systems and tasks. The data is presented as widgets and charts.

<figure><img src="https://2697025545-files.gitbook.io/~/files/v0/b/gitbook-x-prod.appspot.com/o/spaces%2F-LvBxs22wUMicv9uWp6C-1972196547%2Fuploads%2Fgit-blob-06237a315f7f971dc2747775128ce8546a538aef%2Fcross-workspace-statistics-dashboard.png?alt=media" alt="Consolidated cross-workspace statistics dashboard"><figcaption><p>Consolidated indicators of the record of processing activities and data subject requests across all workspaces</p></figcaption></figure>

Dynamic filters let you refine the analysis by workspace, by organizational unit and by type. The **Select a period** button restricts the indicators to a period: select a predefined period (Today, Current week, Current month, Current year, and so on) or a start date and an end date in the calendar, then click **Apply**. When no period is selected, the indicators cover all the data. The **Reset** button removes the selected period. The dashboard can be printed and exported.

## Go further

Follow the tutorial below or start exploring Dastra on your own.

{% content-ref url="/pages/ymDPX7FFOx7WbxbnSdy5" %}
[Tutorial](https://doc.dastra.eu/en/getting-started/tutorial.md)
{% endcontent-ref %}


---

# Agent Instructions
This documentation is published with GitBook. GitBook is the documentation platform designed so that both humans and AI agents can read, navigate, and reason over technical content effectively. Learn more at gitbook.com.

## Querying This Documentation
If you need additional information that is not directly available in this page, you can query the documentation by asking a question.

Perform an HTTP GET request on the following URL with the `ask` and `goal` query parameters:

```
GET https://doc.dastra.eu/en/getting-started/setup/workspace.md?ask=<question>&goal=<user_goal>
```

`ask` is the immediate question: it should be specific, self-contained, and written in natural language.
`goal` is what the user is ultimately trying to achieve, the reason they need the answer. Sharing it helps GitBook give you a better, more relevant answer. A goal is most helpful when it describes the outcome the user wants rather than restating the question. For example, with `ask=how do I create an API token`, a goal like `automate deployments from our CI pipeline` lets GitBook tailor the answer to that use case.

The response will contain a direct answer to the question and relevant excerpts and sources from the documentation.

Use this mechanism when the answer is not explicitly present in the current page, you need clarification or additional context, or you want to retrieve related documentation sections.