> For the complete documentation index, see [llms.txt](https://doc.dastra.eu/llms.txt). Markdown versions of documentation pages are available by appending `.md` to page URLs; this page is available as [Markdown](https://doc.dastra.eu/en/features/integrations/jira.md).
# Jira
Jira integration to synchronize issues with data subject requests in Dastra
### What does the integration do?
The Jira integration synchronizes **Jira issues with Dastra data subject requests (DSR)**, in both directions:
* **Jira → Dastra**: when an issue is created or updated in the configured Jira project, Dastra creates or updates the corresponding data subject request, filling its fields according to your field mapping.
* **Dastra → Jira**: when a request reaches a workflow step, Dastra automatically transitions the linked Jira issue to the status you associated with that step.
### Prerequisites
* A Jira Cloud instance (e.g. `https://your-company.atlassian.net`) and a project to synchronize.
* Depending on the authentication method:
* **Basic** — the e-mail address of a Jira account and an [API token](https://id.atlassian.com/manage-profile/security/api-tokens) for that account.
* **OAuth** — no token to create: you sign in with your Atlassian account and authorize Dastra.
{% hint style="info" %}
The OAuth method appears in the **Authentication method** list when it is available on your Dastra environment. Otherwise, use an API token.
{% endhint %}
### Installation
1. Open **Settings > Integrations** and select **Jira**.
2. On the DSR use case, click **Add integration**.
3. Add a connection:
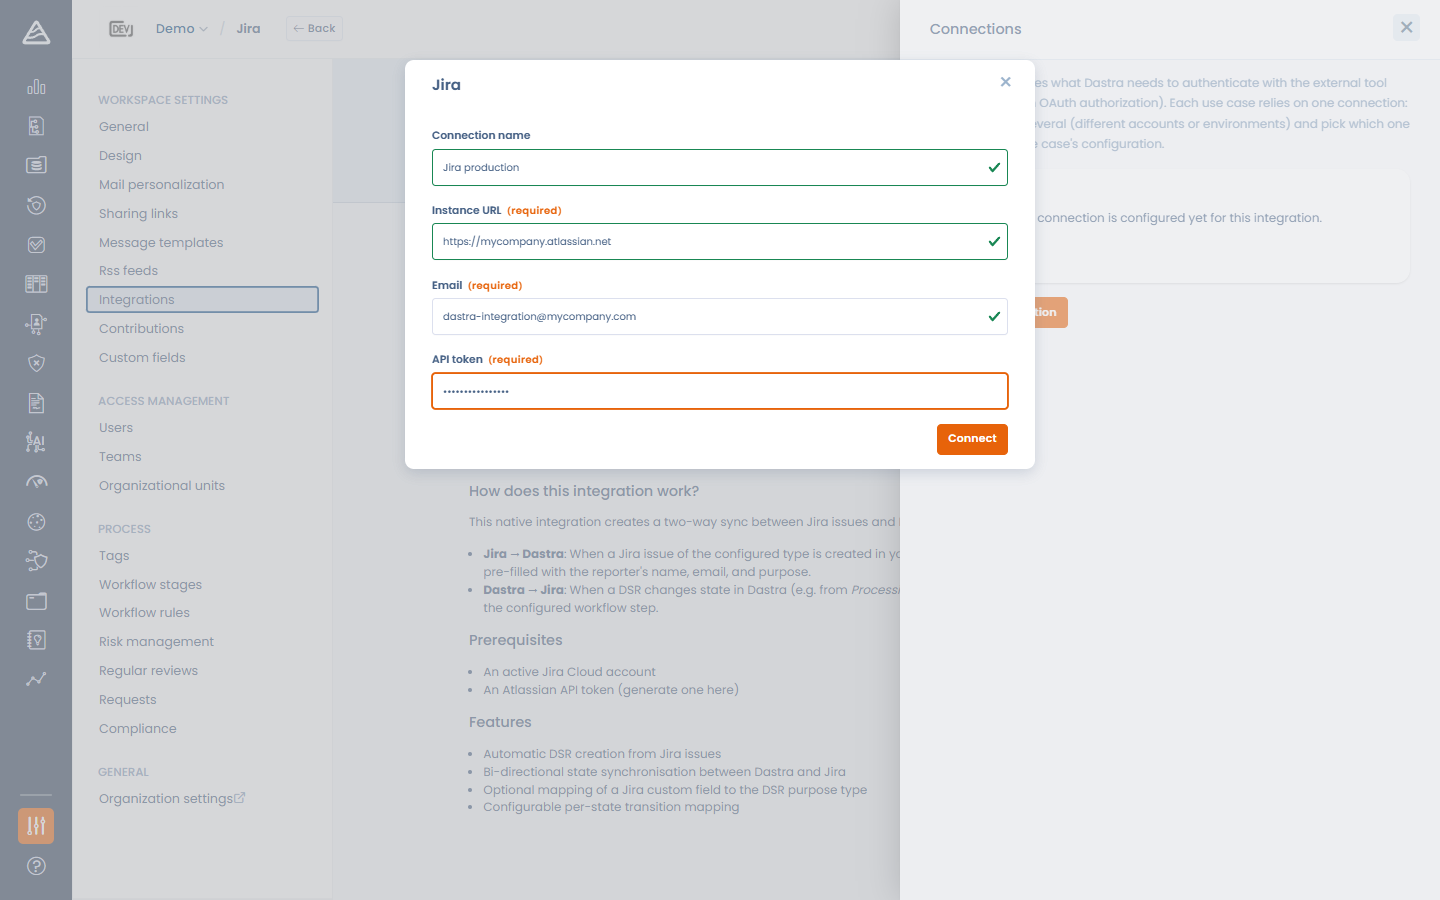
* **Basic**: enter the **Instance URL**, the **Email** and the **API token**, then click **Connect**.
* **OAuth**: enter the **Instance URL**, then click **Save and connect** — you are redirected to Atlassian to authorize Dastra.
Connecting Dastra to Jira
### Configuration
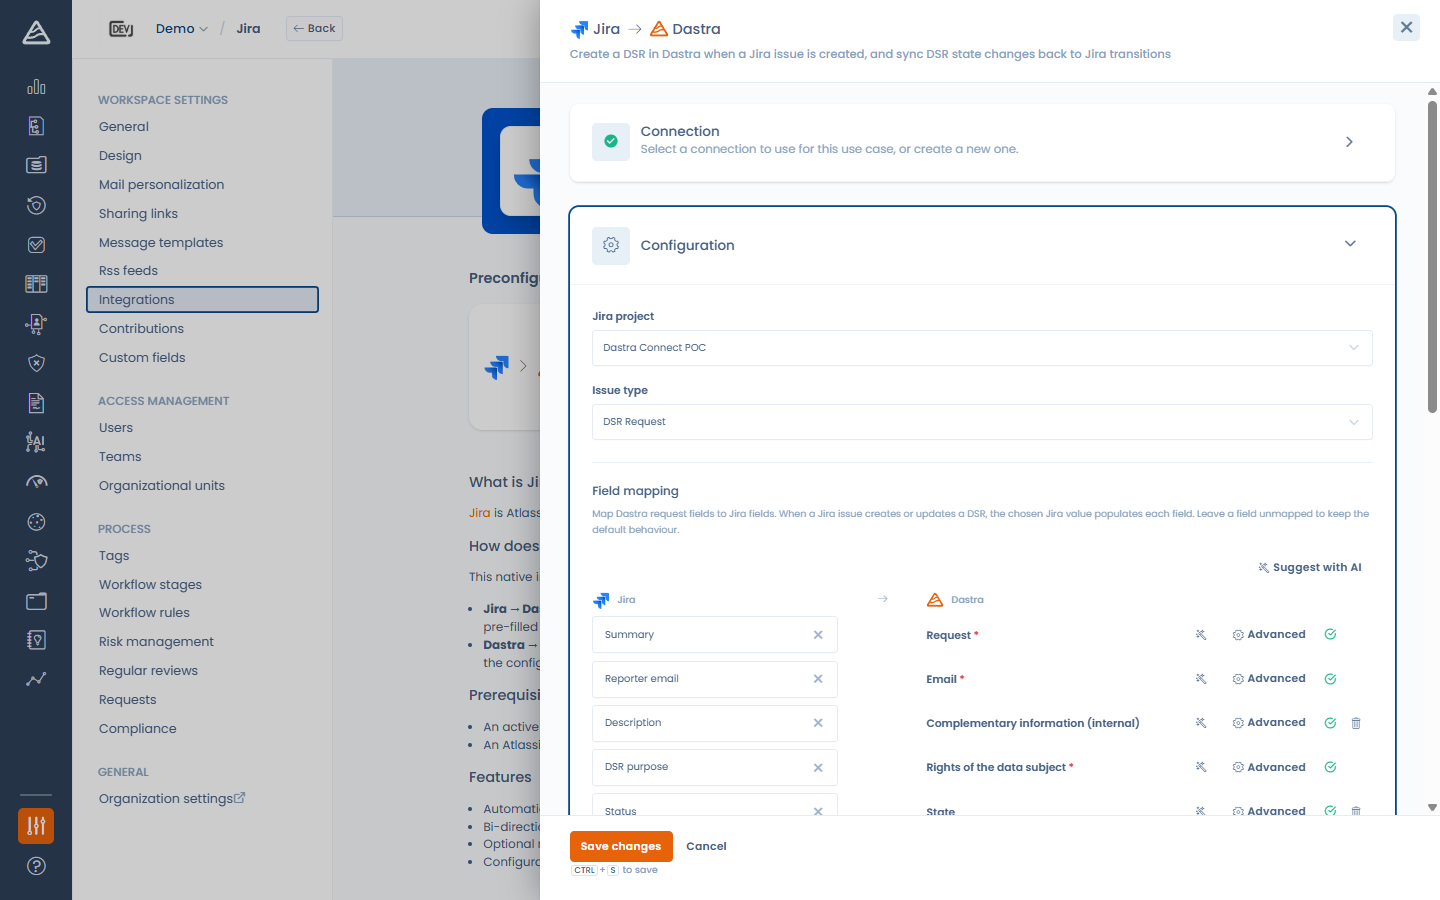
* **Jira project** — the project to synchronize.
* **Issue type** — the issue type that represents a data subject request.
* **Field mapping** — map Dastra request fields to Jira fields. When a Jira issue creates or updates a DSR, the chosen Jira value populates each field. The sources include the standard Jira fields (summary, reporter e-mail, description, status) **and your Jira custom fields**; closed fields (statuses, select lists) can be transcoded to Dastra values in the **Advanced** panel.
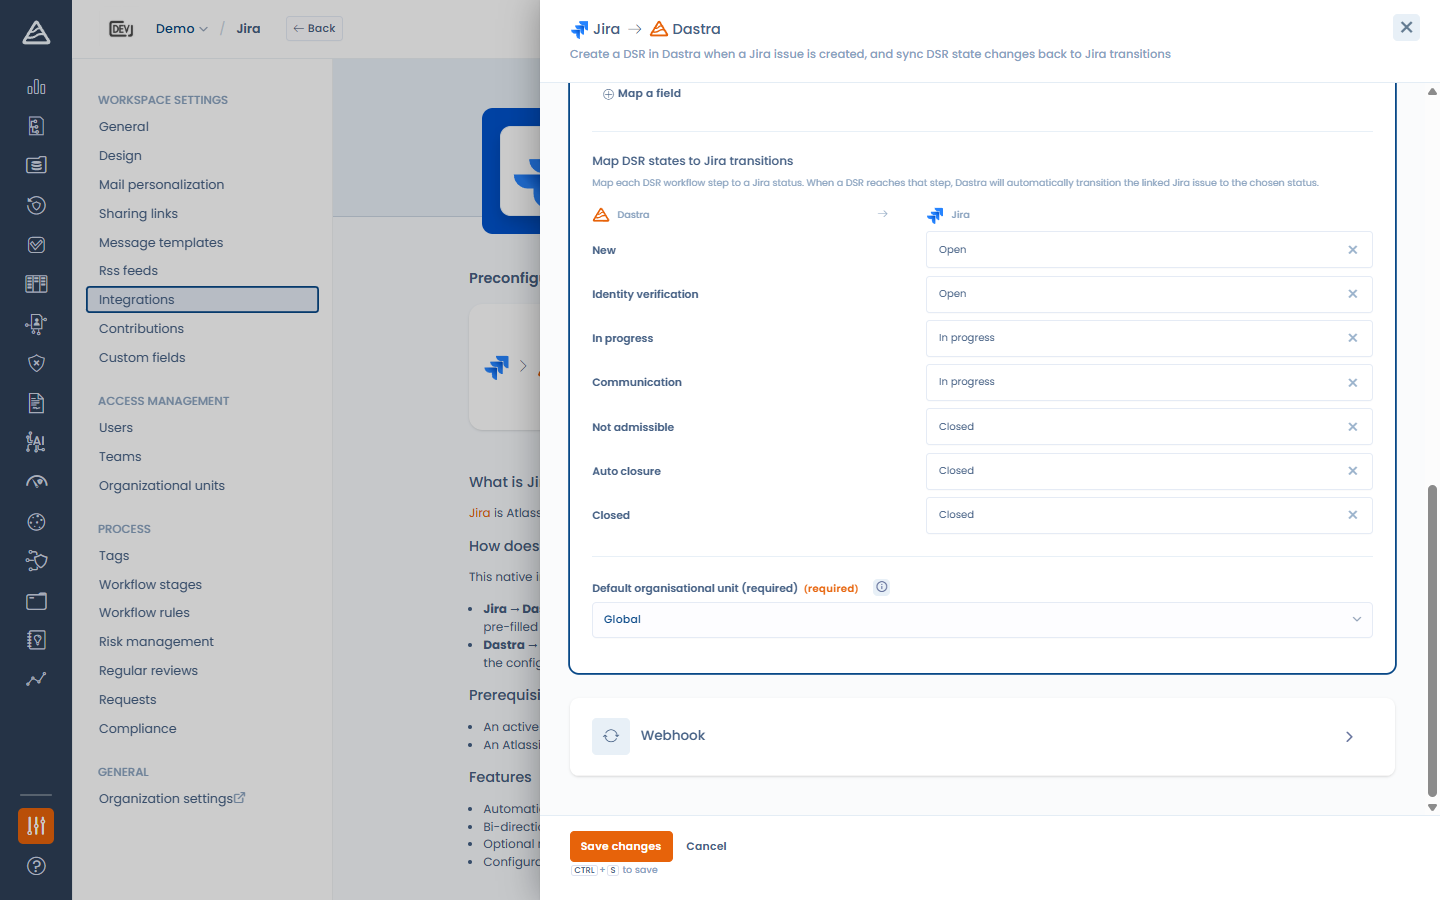
* **Map DSR states to Jira transitions** — associate each DSR workflow step with a Jira status. When a request reaches that step, Dastra transitions the linked issue accordingly. Leave a step on **No transition** to skip it.
* **Default organisational unit** (required) — the unit assigned to requests created by the integration.
Configuring the Jira use case
{% hint style="warning" %}
The **Email** field of the request must be mapped (or given a default value): it identifies the data subject. The configuration cannot be saved without it.
{% endhint %}
Mapping DSR workflow steps to Jira statuses
### Webhook (Jira → Dastra)
Save the configuration first — the inbound webhook URL becomes available once the integration is configured. Then, in the **Webhook** step, two options:
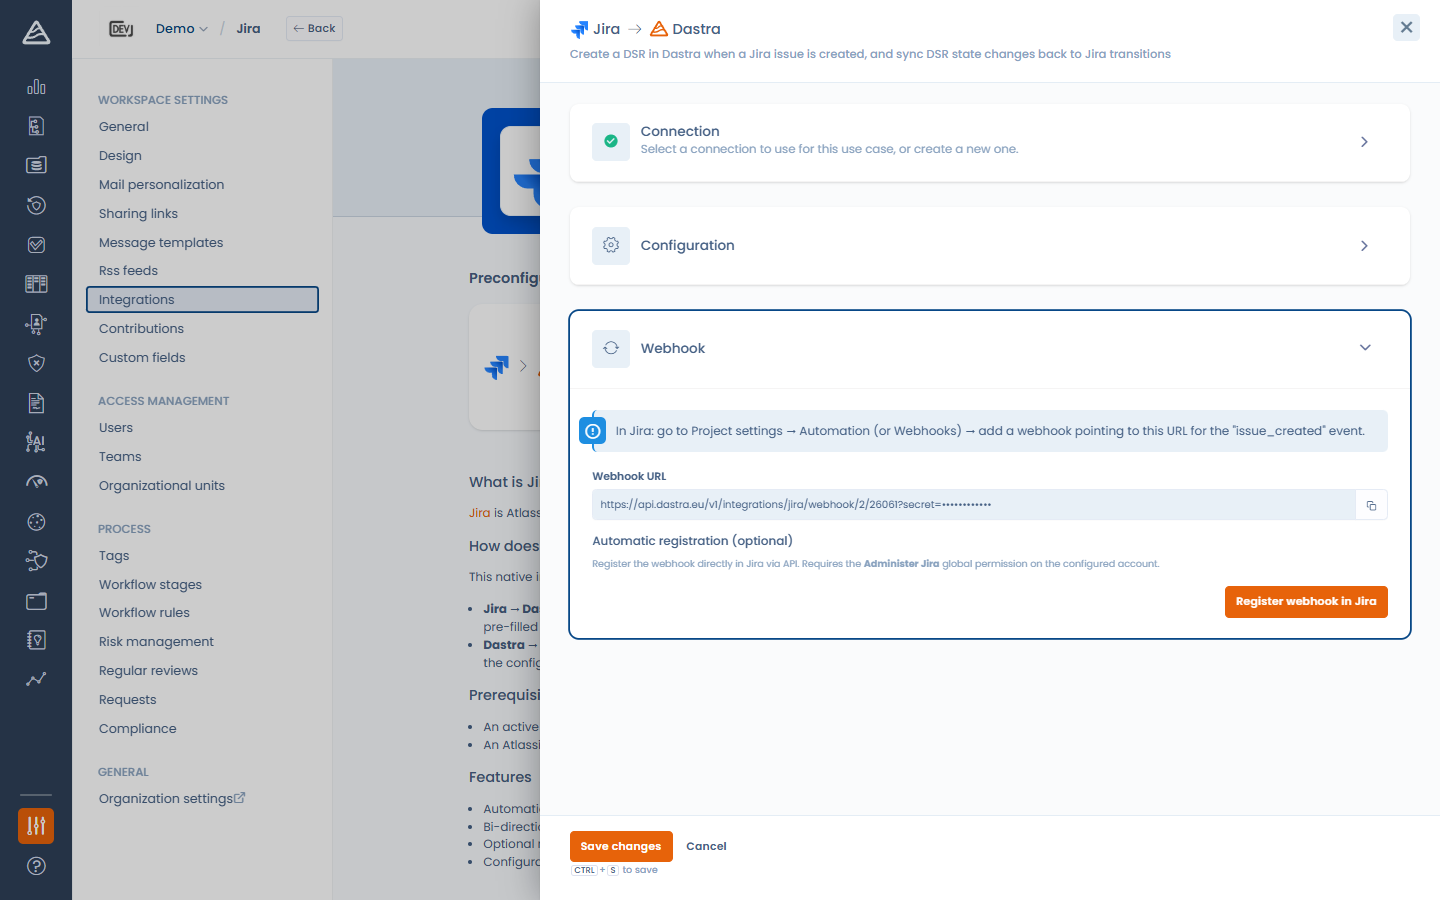
* **Manual registration** — copy the **Webhook URL** and, in Jira, go to **Project settings > Automation** (or **Webhooks**) and add a webhook pointing to this URL for the *issue created* and *issue updated* events.
* **Automatic registration** — click **Register webhook in Jira** and Dastra registers it for you through the Jira API. This requires the **Administer Jira** global permission on the configured account. You can remove it later with **Delete webhook**.
Registering the Jira webhook
### Uninstalling
Uninstalling the integration erases the stored credentials and removes the webhook registered in Jira (when it was registered automatically). The data subject requests created by the integration are kept.
---
# Agent Instructions
This documentation is published with GitBook. GitBook is the documentation platform designed so that both humans and AI agents can read, navigate, and reason over technical content effectively. Learn more at gitbook.com.
## Querying This Documentation
If you need additional information that is not directly available in this page, you can query the documentation dynamically by asking a question.
Perform an HTTP GET request on the current page URL with the `ask` query parameter, and the optional `goal` query parameter:
```
GET https://doc.dastra.eu/en/features/integrations/jira.md?ask=&goal=
```
`ask` is the immediate question: it should be specific, self-contained, and written in natural language.
`goal` is optional and describes the broader end goal you are ultimately trying to accomplish on behalf of the user. GitBook uses it to tailor the answer towards what is most useful for that goal.
The response will contain a direct answer to the question and relevant excerpts and sources from the documentation.
Use this mechanism when the answer is not explicitly present in the current page, you need clarification or additional context, or you want to retrieve related documentation sections.