> For the complete documentation index, see [llms.txt](https://doc.dastra.eu/llms.txt). Markdown versions of documentation pages are available by appending `.md` to page URLs; this page is available as [Markdown](https://doc.dastra.eu/en/dastra-ai/ai-assistant/use-cases.md).

# Use cases

Step-by-step guide to the generation features of Dastra's AI assistant, module by module.

{% hint style="warning" %}
**Note on generated content quality**: all content generated by the assistant is a proposal only. It must be reviewed and updated by a qualified person before use. Dastra makes no commitment as to the quality of the suggested information.
{% endhint %}

All generation features use the same window: describe the item to generate (or start from one of the suggested **Samples**), choose the generation language if needed, then click **Generate**. The proposal is displayed on a summary screen, to be reviewed before you click **Validate**.

In lists, the generation button is an AI icon placed to the left of the create button. It is greyed out if your plan does not include the feature. A few functions, flagged in the relevant sections, do not appear at all in that case. Each generation consumes [AI credits](https://doc.dastra.eu/en/dastra-ai/ai-assistant/how-it-works.md#ai-credits-and-quotas).

Modules: [Processing activities](#processing-activities) · [Repositories](#repositories) · [Questionnaires](#questionnaires-dpia-risk-analysis) · [Data subject requests](#data-subject-requests) · [Data breaches](#data-breaches) · [Contracts](#contracts) · [Custom documents and reports](#custom-documents-and-reports) · [AI systems](#ai-systems) · [Workflow rules and integrations](#workflow-rules-and-integrations) · [Frameworks and controls](#frameworks-and-controls)

***

## Processing activities

### Generate a processing activity

Quickly generate a processing activity in the format expected by Dastra from a short description. The assistant will suggest a name, one or more datasets with their fields, a retention period, security measures, recipients, and a description.

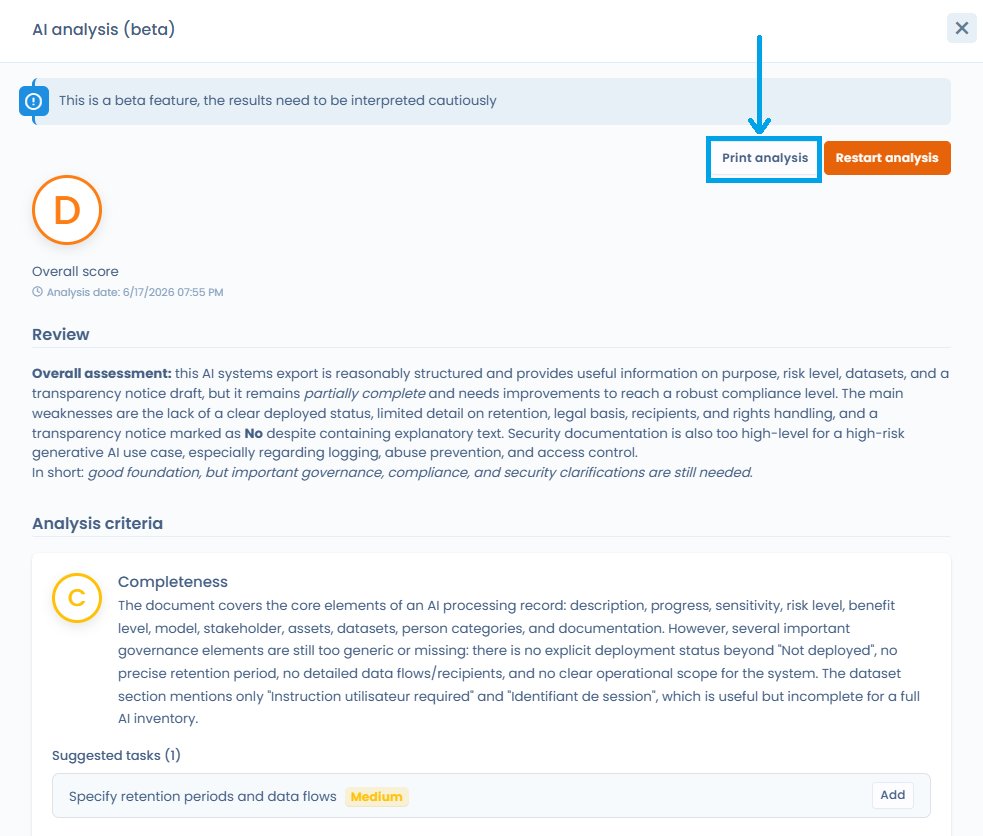
1. In the record of processing activities, click the AI icon to the left of **Create data processing**, or click **Create data processing** then select **AI Generated**
2. Enter a short description of your processing activity, or click one of the **Samples** shown below the input field to pre-fill the request
3. If needed, choose the generation language and enable the options you want:
   * **This activity is carried out as a processor**: generates the record for the processor register
   * **Use existing elements**: provides the assistant with the labels of the existing security measures, assets and data fields in your workspace, so that it reuses them in the generated record instead of creating duplicates. The relevant repositories are listed below the option
4. Click **Generate** and wait a few moments
5. On the summary screen, review the proposal and click **Validate**

<figure><img src="https://2697025545-files.gitbook.io/~/files/v0/b/gitbook-x-prod.appspot.com/o/spaces%2F-LvBxs22wUMicv9uWp6C-1972196547%2Fuploads%2Fgit-blob-f602b142de5155d92c155388e2e061d314785e4c%2Fregister-processing-create-ai-form.png?alt=media" alt="AI processing activity generation window: input field, language selector, samples and Use existing elements option" width="315"><figcaption><p>Generating a processing activity with the AI assistant: samples, generation language and reuse of existing elements</p></figcaption></figure>

### Generate a privacy notice

{% columns %}
{% column %}

1. Go to the editing page of a processing activity
2. In section **11. Documentation**, click **Generate information notice**
3. Choose the desired format (you can customize the instructions by selecting **Custom**) and the **Notice language**; the interface language is offered by default
4. Click **Generate**: the preview lets you copy the text of each tab, or click **Export** to get a PDF, Word, HTML or Markdown file
5. In the **Export information notice** window, the **Add this file to the attachments of this data processing** option, enabled by default, adds the exported file to the attachments of the processing activity; each export creates a new attachment
   {% endcolumn %}

{% column %}

<figure><img src="https://2697025545-files.gitbook.io/~/files/v0/b/gitbook-x-prod.appspot.com/o/spaces%2F-LvBxs22wUMicv9uWp6C-1972196547%2Fuploads%2Fgit-blob-b69233c5855781c7e30e83f6f878e02dbaa2a13a%2Fregister-processing-notice-export-modal.png?alt=media" alt="Privacy notice preview with the Export action" width="350"><figcaption><p>Exporting the AI-generated privacy notice</p></figcaption></figure>
{% endcolumn %}
{% endcolumns %}

<figure><img src="https://2697025545-files.gitbook.io/~/files/v0/b/gitbook-x-prod.appspot.com/o/spaces%2F-LvBxs22wUMicv9uWp6C-1972196547%2Fuploads%2Fgit-blob-95d795c746094bca92809217fa3e7c0c2abc1267%2Fregister-processing-notice-export-attachments-option.png?alt=media" alt="Export information notice window with the option to add the file to the attachments" width="350"><figcaption><p>Adding the exported notice to the attachments of the processing activity</p></figcaption></figure>

### Generate the DPIA criteria assessment

The analysis tab of a processing activity assesses the 9 EDPB criteria for a DPIA from the information of the processing activity.

1. Open a processing activity, then its analysis tab
2. In the **Assessment of the 9 criteria for the DPIA (EDPB)** section, click **Generate assessment**
3. Click **Generate** in the window that opens, then review the result

The **Generate assessment** button does not appear if your plan does not include this feature.

### Generate a compliance analysis for a processing activity

The assistant can analyze an existing processing activity and produce an assessment of its compliance with GDPR documentation requirements.

{% hint style="info" %}
**Beta feature**: results may be less consistent than a stable feature and should be treated with extra care. This analysis is a decision-support tool, not legal advice.
{% endhint %}

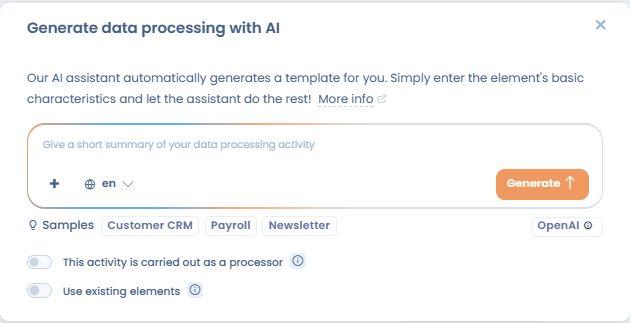
Once the analysis is generated, click **Print analysis** to export the result as a PDF or send it directly to the printer. This document can be attached to your compliance file.

### Analyze an AI system, a contract, an asset, a stakeholder or a response summary

The same analysis is available on AI systems, contracts, assets, stakeholders and the summary of a questionnaire's responses. Open the record, then click the **AI analysis (beta)** button. The window shows the overall score from A to F, the assessed criteria with their justification and the suggested tasks. Use **Analysis history** to compare with a previous analysis, then **Print analysis** to export the result.

### Suggest tags

In a **Tags** field that is still empty, an AI assistant button suggests tags from the name and description of the object. Click it: the suggested tags fill the field. The button exists on processing activities, AI systems, breaches, contract documents, data subject requests, tasks, stakeholders, assets and retention rules. For tag management, see [Tag management](https://doc.dastra.eu/en/features/general/tags.md).

***

## Repositories

### Generate an asset

Quickly generate an asset (software, tool, etc.) in the format expected by Dastra. The assistant will suggest a name, links to the stakeholder's privacy policy, and create a stakeholder as publisher.

1. In the assets list, click the AI icon to the left of **Add an asset**, or click **Add an asset** then select **AI generated**
2. Enter a description or a privacy policy URL
3. Click **Generate**, then review and complete the suggested information before clicking **Validate**

### Generate a stakeholder

1. In the stakeholders list, click the **Generate Actor with AI** icon
2. Give a brief summary of the stakeholder. The assistant searches the web
3. Click **Generate**, review the proposal, then click **Validate**

### Generate a dataset

1. Go to the **Datasets** page
2. Click the **Generate a dataset with AI** icon, or **New dataset** then **AI Generated**
3. Enter a short description of your dataset
4. Click **Generate** and wait a few moments
5. On the summary screen, apply your corrections and click **Validate**

### Generate a security measure

In the measures list, click the **Generate a measure with AI** icon, describe the measure, click **Generate**, then **Validate**. This feature belongs to the risk options of your plan.

***

## Questionnaires (DPIA, risk analysis…)

### Generate an AI-assisted response

1. Go to the **Questionnaires** section and select the desired template (e.g. CNIL PIA)
2. Click **Plan questionnaire**
3. Select **AI-assisted response**
4. Specify the processing activity to use as a source, or enter custom instructions
5. Once the response is generated, apply your corrections directly in the questionnaire

{% hint style="info" %}
When an AI analysis has been performed on a questionnaire response or a DPIA, a **Print analysis** button appears in the header of the analysis panel as soon as a result is available. The structured document includes the overall score (A to F), the general assessment, the assessed criteria with their score and justification, as well as the suggested tasks ranked by priority, without relying on screenshots.
{% endhint %}

### Generate a questionnaire template

1. Go to the **Questionnaires** section and click to create a questionnaire template
2. Select **Create from AI**
3. Provide a description of the questionnaire (300 words) and a type
4. Adjust the number of sections and questions
5. Click **Generate**

### Translate a questionnaire with AI

In the builder of a saved questionnaire template, click **Translate questionnaire**: the AI translates all the sections and questions of the template into another language. Choose the target language and how the result is saved.

***

## Data subject requests

### Generate a response to a request

Generate responses in multiple languages, with customization options (length, formal or informal tone, etc.).

1. Open a request currently being processed
2. Go to the **Response** section
3. Click **Generate with AI**: the **Requests AI Chatbot** window opens and the assistant generates a response based on the following information:
   * First and last name of the requester
   * Request message
   * Language to use
   * Workspace name
   * Purposes of the relevant processing activity
   * Name of the request operator
   * Request date and number of days remaining
   * Request status and ID
4. Edit the proposed text or use the reformulation options (shorten, lengthen, change tone)
5. Click **Use this message**, then send it from Dastra

{% hint style="info" %}
A limit on the number of calls per minute is in place for this feature.
{% endhint %}

### Redact a document automatically

From an attachment of the request, the redaction editor offers the **Auto-redact with AI** button: the AI identifies the personal data of third parties and places the redaction areas for you to validate. The button only appears if AI redaction is included in your plan. Each document segment sent consumes 1 credit. See [Redact a document](https://doc.dastra.eu/en/features/requests/redaction.md).

{% hint style="info" %}
**AI Act, Article 50**: when a response is generated by the AI assistant, the strict obligation of Art. 50(1) (informing the person that they are interacting with an AI system) does **not** apply, because there is no direct interaction between the AI system and the data subject: a human user reviews, validates and sends the response. It nevertheless remains recommended to inform the data subject as a GDPR best practice (Art. 5(1)(a) fairness). See the [FAQ](https://doc.dastra.eu/en/dastra-ai/ai-assistant/faq.md) for the full analysis.
{% endhint %}

***

## Data breaches

### Generate a post-mortem

From an existing breach record, the assistant generates a structured post-mortem document including a description of the incident, the affected data, and the measures taken.

In the post-mortem tab of the breach record, mark the post-mortem as done, then click **Generate with AI**.

***

## Contracts

### Extract contract metadata

Import a contract document (PDF, image or URL) and let the assistant automatically extract its metadata: parties, subject, duration, key clauses, etc.

In the **Contracts** module, click the create button, then **Import your document**.

***

## Custom documents and reports

### Generate a custom document

Enter your own instructions and optionally provide source content. The assistant generates a structured document according to your specifications. In the **Contracts** module, click the create button, then **Create your document with AI**.

### Generate a document from the file manager

In the document editor of the file manager, click **Generate with AI**, describe the document, then optionally choose an asset and a processing activity to serve as context.

### Generate a custom report

From the **Custom reporting** module, click the **Generate a custom report with AI** icon and describe the desired report in natural language. The assistant produces a first version that you can then refine.

***

## AI systems

### Generate an AI system

1. In the record of AI systems, click the **Generate with AI** icon to the left of the create button
2. Enter a short summary of your AI system (name, AI model, etc.)
3. Click **Generate**, review the proposal, then click **Validate**

The same approach exists for AI models: describe the model (name, publisher, etc.).

### Generate an information notice for an AI system

In the **Documentation** tab of an AI system record, click **Generate your information notice** to automatically produce the information document intended for users or data subjects.

### Generate the role justification

In an AI system record, next to the choice of your responsibility (provider, deployer, etc.), click the AI icon **Generate a description of the responsibility with AI** to get a proposed justification.

### Generate a risk analysis for an AI system

The assistant analyzes the fields filled in on the AI system record and produces an assessment of the associated risks. In the record, the button is called **Generate classification**; it does not appear if your plan does not include this feature.

{% hint style="info" %}
**Beta feature**: to be treated with extra care and validated by an expert before any decision.
{% endhint %}

Once the analysis is generated, click **Print analysis** to export the result as a PDF. This document can be attached to your AI Act compliance file.

<figure><img src="https://2697025545-files.gitbook.io/~/files/v0/b/gitbook-x-prod.appspot.com/o/spaces%2F-LvBxs22wUMicv9uWp6C-1972196547%2Fuploads%2Fgit-blob-ee31b1298158490215cf34575abbdcbfa243a7ea%2Fgeneralites-ai-assistant-cas-dusage-analysis-print.png?alt=media" alt="AI analysis panel with the Print analysis and Restart analysis buttons" width="490"><figcaption><p>The "Print analysis" button exports the analysis result as a PDF</p></figcaption></figure>

### Generate the business value assessment

In the part of the record about the expected benefit of the AI system, click **Generate evaluation** to get an analysis of the business value. The button does not appear if your plan does not include this feature.

***

## Workflow rules and integrations

* **Rule description**: in the title window of a workflow rule, click **Generate** to get a description of the rule.
* **HTTP action**: in an HTTP request action, click **Generate with AI** to pre-fill the request. The button is reserved for users who manage integrations.
* **Integration field mapping**: click **Suggest with AI** to propose the mapping of all fields, or **Suggest this field's mapping with AI** on a row for a single field.

These buttons do not appear if your plan does not include the AI assistant.

***

## Frameworks and controls

### Suggest controls, requirements and tests

From a framework in the Compliance module, the assistant suggests controls and tests based on the context of the relevant object (name, description, associated framework).

* **Controls**: on the page of a requirement, click **Add controls**, then **Create or link with AI**. The results are split between **Existing controls** of your library and **New controls** to create. The tests of the new controls are generated with them.
* **Tests**: from a control, click **Select or generate tests with AI**. The results are split between **Existing tests** and **New tests**.
* **Requirements**: in the window to create a requirement, an AI icon next to the reference field suggests a reference.

### Analyze test evidence

In the evidence table of a test, click **Analyze** in the AI column. The assistant compares the evidence with the test procedure and shows its **Analysis confidence** and **Details**. New evidence is analyzed automatically as long as **AI evidence auto-scan** is enabled, which is the default: you turn it off per workspace in **Workspace settings** > **Compliance**.


---

# Agent Instructions
This documentation is published with GitBook. GitBook is the documentation platform designed so that both humans and AI agents can read, navigate, and reason over technical content effectively. Learn more at gitbook.com.

## Querying This Documentation
If you need additional information that is not directly available in this page, you can query the documentation by asking a question.

Perform an HTTP GET request on the following URL with the `ask` and `goal` query parameters:

```
GET https://doc.dastra.eu/en/dastra-ai/ai-assistant/use-cases.md?ask=<question>&goal=<user_goal>
```

`ask` is the immediate question: it should be specific, self-contained, and written in natural language.
`goal` is what the user is ultimately trying to achieve, the reason they need the answer. Sharing it helps GitBook give you a better, more relevant answer. A goal is most helpful when it describes the outcome the user wants rather than restating the question. For example, with `ask=how do I create an API token`, a goal like `automate deployments from our CI pipeline` lets GitBook tailor the answer to that use case.

The response will contain a direct answer to the question and relevant excerpts and sources from the documentation.

Use this mechanism when the answer is not explicitly present in the current page, you need clarification or additional context, or you want to retrieve related documentation sections.